Introduction: Data Sources
Data sources form the foundation of the knowledge base for your chat agents on the Evoya platform. They are used to provide relevant information that agents can utilize to deliver precise and well-informed answers. By integrating and configuring data sources, you can expand the informational scope of your agents as needed.
The Evoya platform supports three main types of data sources, allowing you to include a variety of information:
-
Raw Text: This consists of plain text data that you can manually add. These texts are used by agents as a knowledge base to answer specific queries.
-
Web Data: This type allows you to include content from websites via URLs. Agents can browse the provided websites and use the information as a knowledge source.
-
Files: Documents such as PDFs, Word files, Excel spreadsheets, or CSV files can be uploaded or added via file URLs. The contents of these files are extracted and made available to agents.
Features and Functional Scope
The Evoya platform offers a range of features for managing and utilizing data sources, ensuring agents have access to a rich knowledge base. Here are the key features:
Supported Data Source Types
- Raw Text: Add plain text data manually to create a foundational knowledge base.
- Web Data: Include content from websites using URLs, enabling agents to browse and extract information.
- Files: Upload or link documents such as PDFs, Microsoft Word files (doc, docx), Microsoft Excel spreadsheets (xls, xlsx), CSV files, Microsoft PowerPoint presentations (ppt, pptx), or Markdown files (.md), with content automatically extracted.
File Management Features
- Multiple file upload options:
- Drag-and-drop functionality for quick file additions.
- Linking files using URLs.
- Frequency settings for regular updates.
- Crawl depth settings for linked file content.
Data Source Configuration
- Flexible activation status: Enable or disable data sources as needed.
- Access settings: Choose between Team or Private access.
- Secure storage in Switzerland, with support for custom providers.
Agent Integration
- Assign data sources to specific chat agents.
- Enable agents to access relevant data through toggle-based activation.
Dynamic Updates
- Update URLs, text, or files without recreating the data source.
- Regular updates ensure data remains current and relevant.
These features ensure a comprehensive and flexible approach to managing data, enhancing agent capabilities for precise and well-informed responses.
Adding Data Sources
Step 1: Create a New Data Source
To add a new data source, navigate to the Data Sources section in the sidebar menu. Here, you will see a list view of all existing data sources. To create a new data source, click on the «+ Data Source» button in the top-right corner. On the next page, you can choose between the three available types of data sources: Raw Text, Web Data, or Files. Select the desired type and click «+ New» to start the setup process.
Step 2: Add Basic Information
Regardless of the data source type, the process always begins with adding basic information:
- Data Source Name: Assign a unique name to the data source, which will help you easily identify it later and provide the agent with clear guidance on the type of information it contains. A precise name and a meaningful description are essential to ensure that the agent understands and uses the content correctly.
- Description: Add a clear description to define the purpose and content of the data source. This helps the agent correctly interpret and apply the data in their tasks.
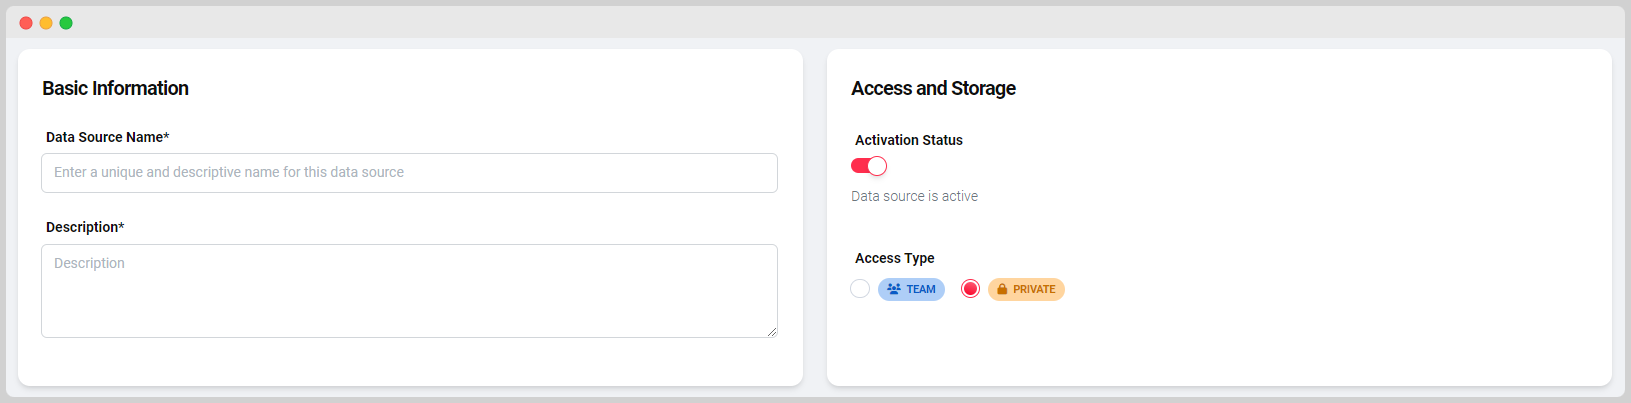
Step 3: Configure Access and Storage
In the next step, you can define access options and the storage location for the data source:
- Activation Status: Decide whether the data source should be activated or deactivated. By default, it is activated.
- Access Type: Specify whether the data source should be available to the Team or only Private.
- Storage Provider: By default, the data source is vectorized and stored securely in Switzerland. If you wish to use another cloud or storage provider, contact us through our Support Form for assistance.
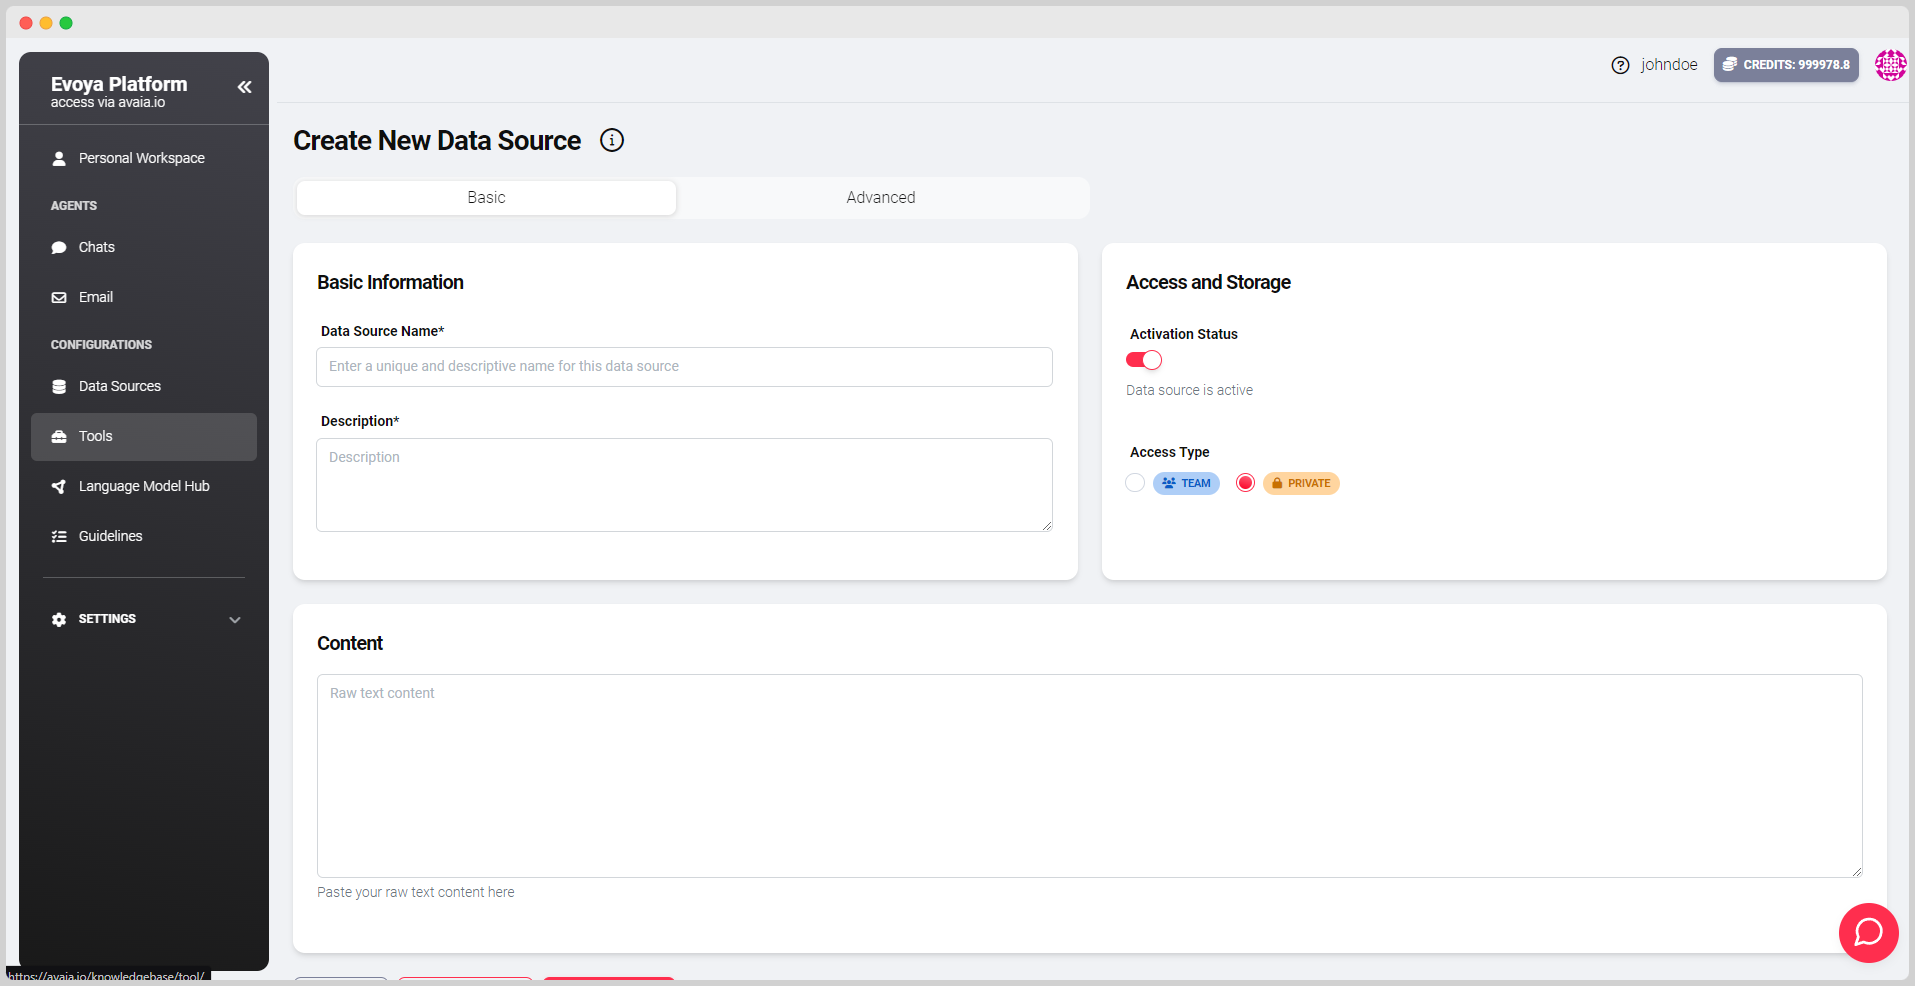
Step 4: Add Content
Depending on the type of data source, you can add the appropriate content in the final step.
Raw Text
Create a data source with plain text.
- Enter the desired text directly into the input field.
- Click «Update Data» to save the data and make it accessible to the agent.
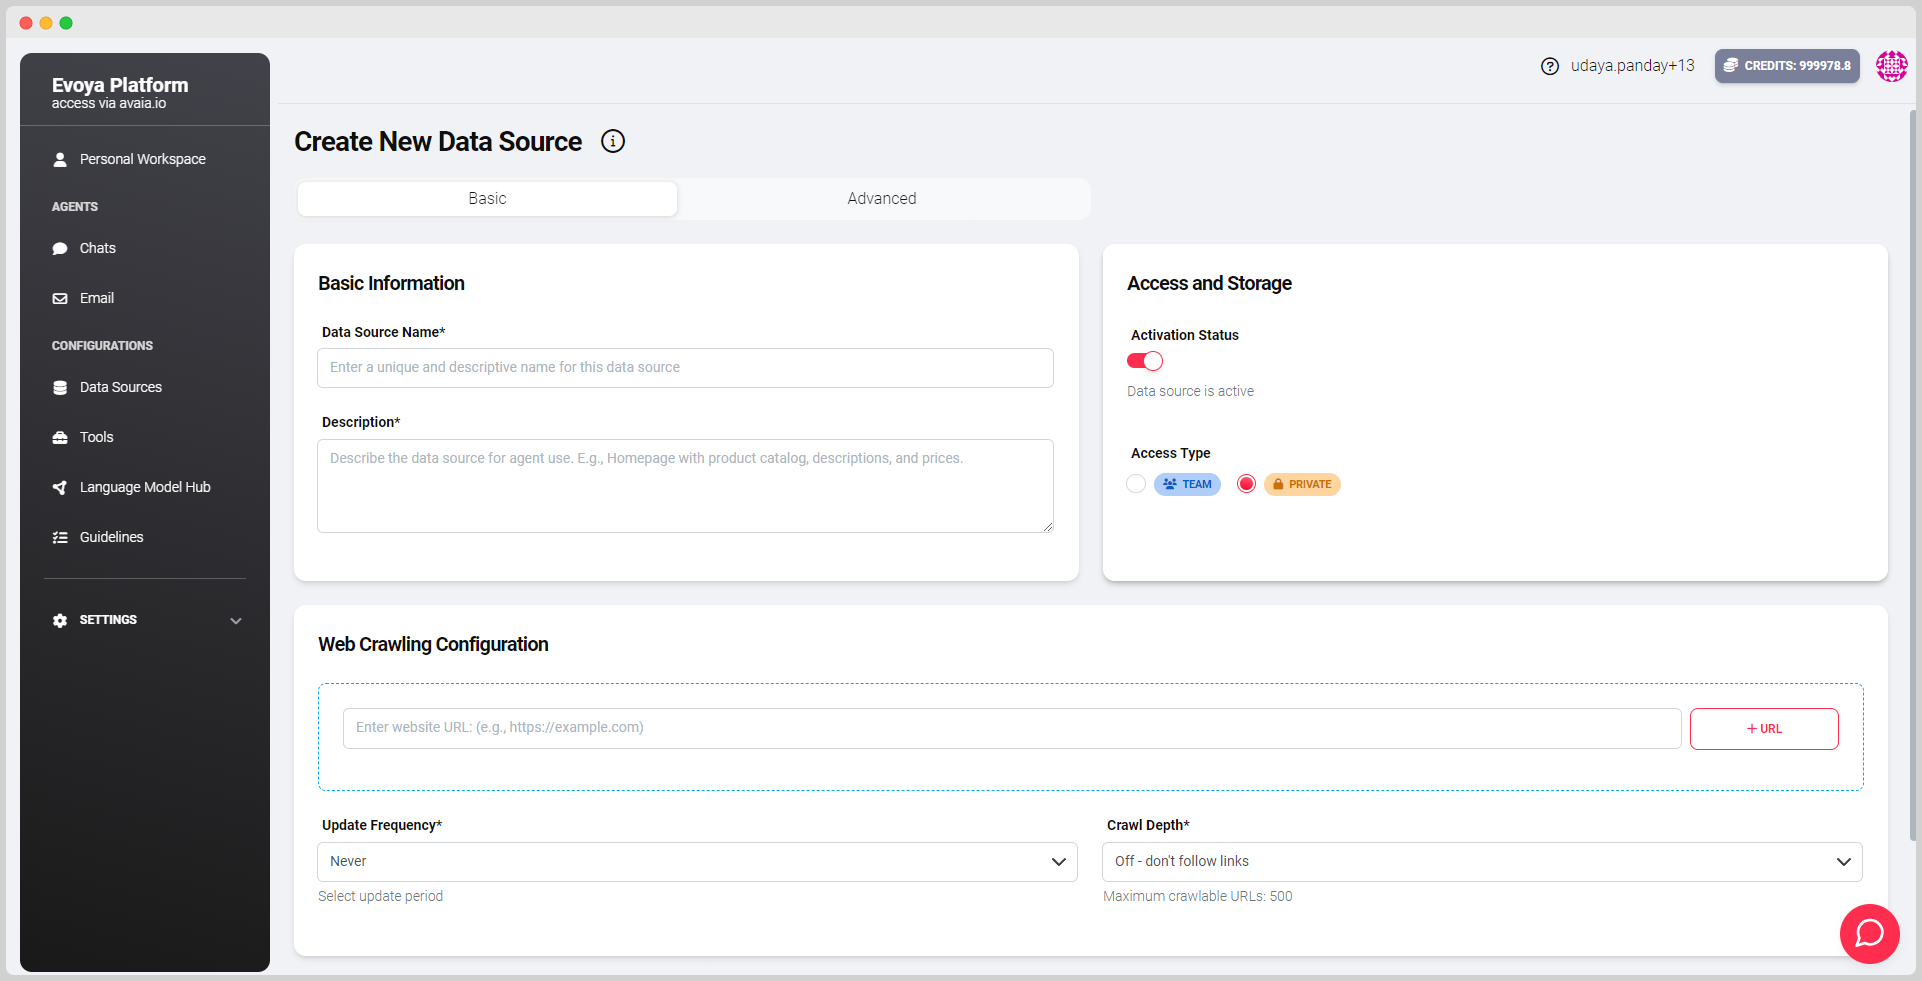
Web Data
Add one or more URLs whose content the agent should browse.
- Enter the URL in the input field.
- Click «Plus-URL» to add the URL to the data source.
- Set the update frequency (e.g., daily or weekly).
- Define the crawl depth (from level 1 to 3) to specify how deeply the agent should follow links on the webpage.
- Click «Update Data» to save the changes.
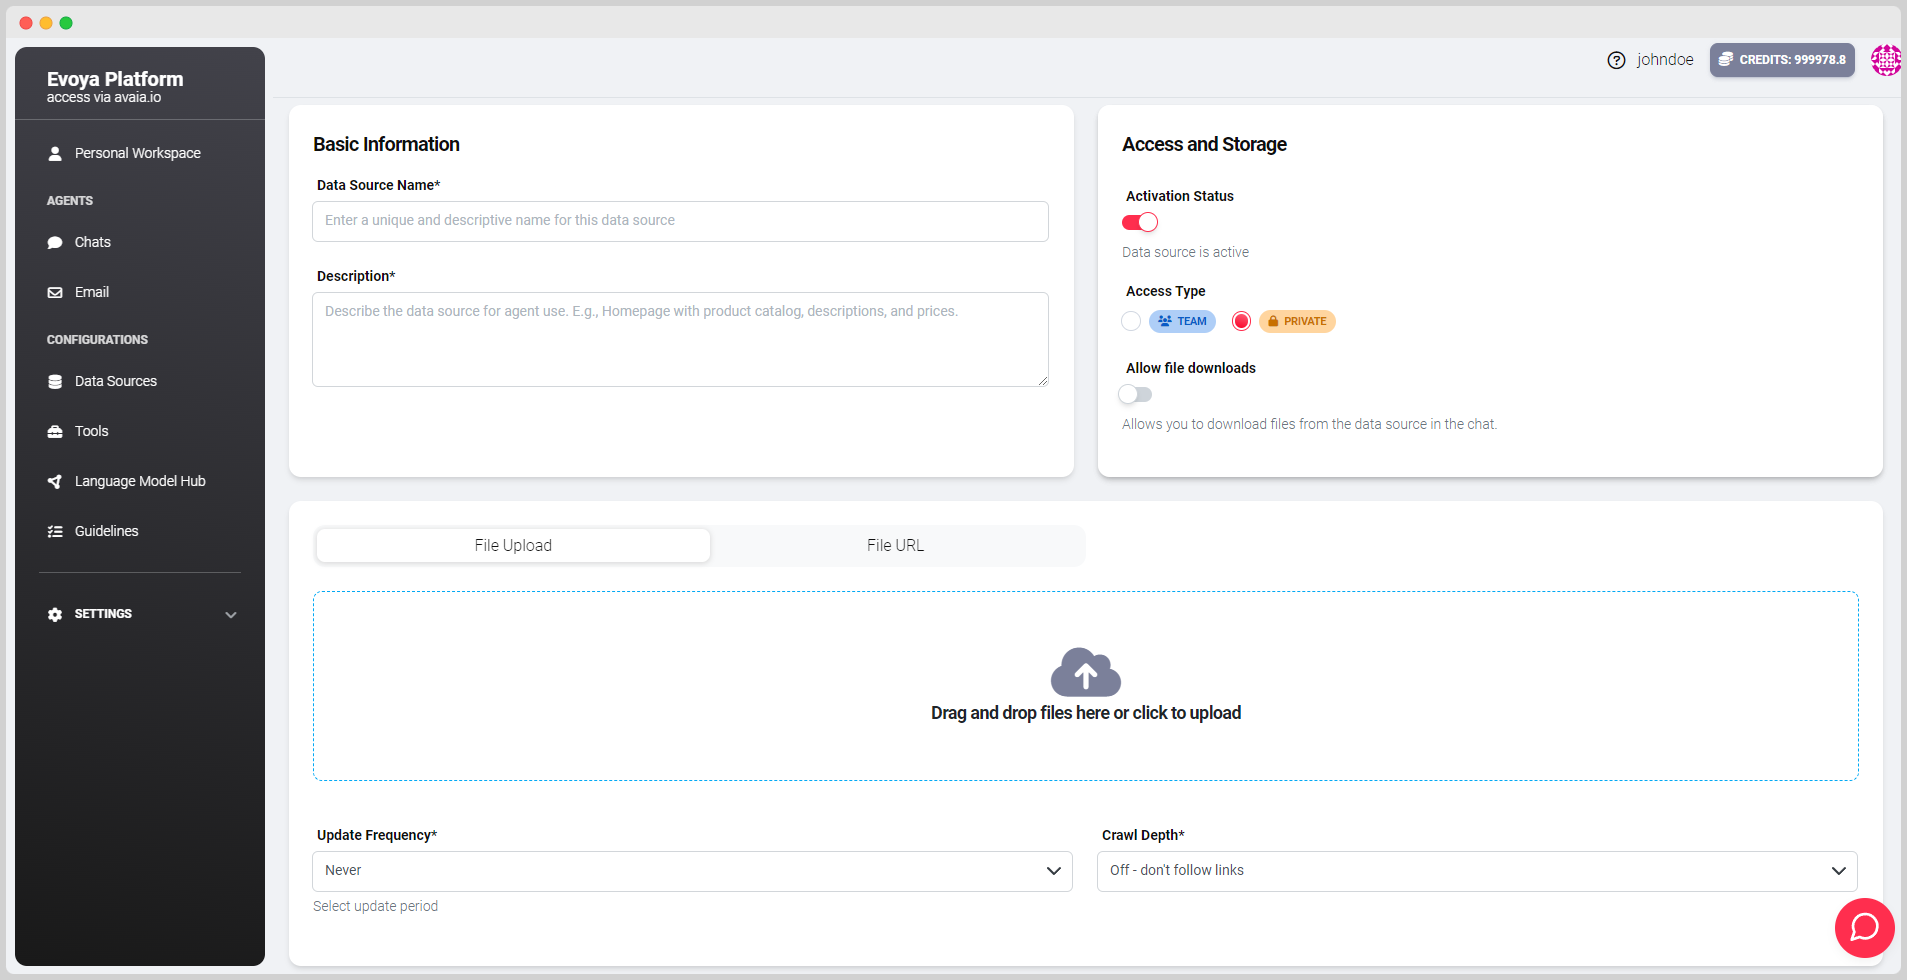
Files
Upload documents such as PDFs, Word files, Excel spreadsheets, or CSV files, or add a file URL. Use the drag-and-drop zone or click on it to select files manually.
- Select the «Upload File» tab to add files from your device:
- Drag and drop the desired file into the zone, or
- click on the zone to select the file manually.
- Select the «File URL» tab to add a file URL:
- Enter the URL into the input field.
- Add the URL using the «Plus-URL» button.
- Set the update frequency.
- Define the crawl depth (from level 1 to 3) to determine which linked content should be considered.
- Click «Update Data» to make the data available.
Updating Data Sources
To edit an existing data source, navigate to the Data Sources section in the sidebar menu. The overview displays all existing data sources.
Step 1: Open Edit Mode
- Select the desired data source by either clicking on its title or the Edit icon (pencil symbol) on the far right of the list.
- This will take you to the edit mode, where you can adjust the settings and contents of the data source.
Step 2: Edit Data Source
Raw Text
- Modify the existing text in the input field.
- Click «Update Data» to save the changes.
Web Data
- Edit existing URLs:
- Edit: Click the edit icon next to the URL to adjust the address.
- Remove: Delete unwanted URLs using the remove icon.
- Add new URLs if needed:
- Enter the new URL in the input field and click «Plus-URL».
- Optionally adjust the following settings:
- Update frequency (e.g., daily, weekly).
- Crawl depth (levels 1 to 3).
- Click «Update Data» to save the changes.
Files
- Upload File:
- Remove existing files using the remove icon on the right of the file.
- Add new files via the drag-and-drop zone or by clicking to select files manually.
- File URL:
- Remove existing URLs using the remove icon.
- Add new file URLs by entering them in the input field and clicking «Plus-URL».
- Optionally adjust the update frequency and crawl depth.
- Click «Update Data» to save all changes.
Activating Data Sources for Chat Agents
After creating and configuring a data source, the next important step is to assign and activate it for a specific chat agent. An easy way to access this page is via the Agent Overview. Click on the respective agent to navigate to the edit page, where you can add the data source to the agent and activate it by toggling the switch. Each data source is deactivated by default and must be manually activated for the agent to access it.